Product News
2019/07/30
KRK Audio Tools app now available on iOS and Android

The new KRK Audio Tools app can help anyone better build their studio! We are happy to tell you that the free KRK Audio Tools app is now available for download from the Apple or Android market. This is a software that contains professional studio tools and five practical analysis components. It can help you better deploy any brand of speakers. There is also a powerful tool (EQ calibration) to make the new KRK ROKIT G4 adapts better to the acoustic environment they are in.
The KRK Audio Tools app is a disruptive product that will improve the quality of mixing for the new ROKIT G4 series. When listening from a professional angle, G4 is completely different from G3. It can be said that G4 is an upgrade based on G3, so our EQ calibration tool is intended to make your G4 get a flatter frequency response curve, so that you "Win at the starting line." Although the quality of the mix is mainly determined by the music itself and your ears, it is always helpful to have the functions in these apps.
Five items in the App tool can be used for any speaker. Such as Level Meter, this function can be used in conjunction with the speaker volume calibration function to ensure that all speakers are at the same volume level. In addition, the Delay Analysis function can be used to measure the time when the sound comes out of each speaker and reaches the user's ear. In addition, the Polarity function in the app is used to detect whether the speaker wiring is accurate to minimize the loss of low frequencies and incorrect stereo image. The Spectrum RTA and sound generator are very helpful for finding subtle problems in the environment. There is also a speaker angle measurement function, which is used to help you determine whether the angle and distance of the speaker are at the ideal point. After that, our EQ calibration tool is designed for G4. It uses pink noise to measure the ideal EQ curve of the speaker, which can be manually adjusted behind the G4 speaker.
Here we introduce each tool:
The EQ calibration tool is specifically designed for ROKIT G4 users, and unlike several other tools, it can be used with speakers of any brand. Using this tool, you can know which parameter behind G4 to adjust to achieve more EQ performance. We recommend that you use this tool after adjusting the angle and volume of the speaker.
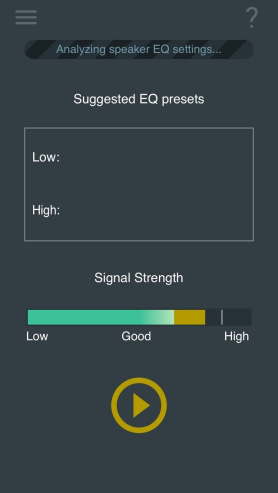
To use this EQ calibration tool, you need to use a Y-shaped branch from your headphone jack to the speaker, and then put the phone in the usual listening position, and press the play button, then, a section for measurement Pink noise will be played. Check the detection signal on the volume meter to ensure that the signal is not too large or too small. This measurement usually takes about 20 seconds. When testing, move your phone in a figure 8 path, which will allow you to get a more realistic and objective data.
Once the analysis is complete, the screen will display a recommended EQ preset number. Then you can use the knob on the back of G4 to choose. Our EQ calibration software can provide you with a flatter response curve. In the end, you still need to get the right settings based on your preferences, music style and your ears.
The Spectrum RTA tool is used to test and display the frequency response graph of the input signal in real time. It uses a fast algorithm to generate the frequency response range graphic. This analysis function can be used to detect factors that affect your listening experience. It includes a signal generation tool that can generate sine waves, white noise, and pink noise. It also has a peak hold function. If you tap the screen, a cursor will be displayed to let you know the frequency response information and volume information. To cancel this display, just drag it out of the screen.
The Level Meter tool is designed for speaker volume calibration (this ensures that your speakers are at the same volume). We recommend calibrating one speaker at a time to ensure accurate results.
In order to calibrate your speakers, you first need to use a Y-shaped cable to connect your headphone jack to the speakers and play the pink noise generated by the software. The ideal placement of the mobile phone microphone is in your usual listening position. The Level Meter shows two icons to reflect the actual volume of the speaker, the green one indicates the RMS value, and the yellow one indicates the peak value. You can click the max peak label at the bottom of the level meter to reset its value. And there is a red indicator light above the meter can also be reset by clicking.
Monitor Align Tool can be used to adjust the angle of the speakers in the studio.
The distance between the left and right speakers needs to be maintained at about 1 to 1.5 meters, and it needs to maintain an angle of 30 degrees with the audience. This will form an equilateral triangle. The speakers need to be at the same height as your ears.
To use the speaker angle adjustment tool, first position your speakers directly to ensure that their extensions do not overlap, then place your phone on the left or right speaker. Click the speaker button on the left or right, and then slowly turn the speaker to a 30 degree angle position. When it reaches 30 degrees, the screen will turn green. Then you can do this step on another speaker.
Delay Tool is used to calibrate the time performance of speakers in multiple speaker systems. The sound from different speakers arrives at your ears at different times. If the time is uneven, this may lead to undesirable results. This tool allows you to calculate the time information for each speaker to reach the listening point.
To be able to measure the time when the sound of the speaker reaches your ears, first place the microphone as close as possible to the speaker and press the play button. This generates a reference value of zero seconds. Then, set the microphone to the listening position and press the play button. This measures the actual delay information from the speaker to the ear. This information needs to be as consistent as possible for different speakers. You can use this measured information to find where the speakers are placed.
This tool is very helpful for finding the distance between different speakers. You can use this distance information and the speaker angle measurement tool to find the speaker placement.
Polarity Tool is a tool used to check whether the speaker wiring is correct. The polarity of a single speaker is very important. If the polarity is wrong, the sound will sound lack of low frequency and generate a wrong stereo image.
In order to use Polarity Tool, use a Y-cable to connect your phone and speaker, and then send a self-contained audio signal to the speaker, and point the microphone to the speaker. You can see an audio in the interface of the polar tool input signal. Adjust the volume of the speaker until the waveform of the test signal is displayed correctly and freeze the waveform. You need to maintain a distance of 1 inch to 12 inches between the phone and the speaker. At this time, you can see the test results. Green (+) represents the forward direction, and red (-) represents the reverse direction. You can repeat this process on other speakers.
Please note that in some models, the polarity of the high-frequency unit is designed to be opposite to that of the low-frequency unit.
We hope these audio tools can help you achieve good results in the field of audio production, and look forward to hearing from you!